- TinyMCE
This extension draws a TinyMCE HTML editor using a jQuery plugin. TinyMCE is a platform independent web based Javascript HTML WYSIWYG editor control released as Open Source under LGPL by Moxiecode Systems AB.
TinyMCE has the ability to convert HTML TEXTAREA fields or other HTML elements to editor instances.
Download - http://www.yiiframework.com/extension/tinymce
Demo - http://www.tinymce.com/tryit/full.php - CKEditor
CKEditor is a text editor to be used inside web pages. It's a WYSIWYG editor, which means that the text being edited on it looks as similar as possible to the results users have when publishing it. It brings to the web common editing features found on desktop editing applications like Microsoft Word and OpenOffice.
Because CKEditor is licensed under flexible Open Source and commercial licenses, you'll be able to integrate and use it inside any kind of application. This is the ideal editor for developers intending to provide easy and powerful solutions to their users.
CKEditor provides all features and benefits users and developers expect having on modern web applications. Its amazing performance keep users focused on the things to be done. You will find all common features available on text editors, as well as additional components specially designed for web contents.
If you think the default features are not enough, CKEditor provides a strong and rich JavaScript API, making it possible to extend it to fit all needs. You can even consider that it has too much features, and removing them is even easier.
Fully compatible
One of the strongest features in CKEditor is its almost unlimited compatibility. It's a JavaScript application, so it simply works with all server technologies, just like a simple textarea. In the browser side instead, it has been developed to be compatible with the browsers that dominate the market, namely Internet Explorer, Mozilla Firefox, Google Chrome, Safari and Opera. Even the old Internet Explorer 6 is compatible with.
Download - http://www.yiiframework.com/extension/ckeditor
Demo - http://ckeditor.com/demo - NicEdit
NicEdit is a WYSIWYG editor for websites. Its goal is to be as simple and fast as possible for users of your application. NicEdit is extremely lightweight and can be easily integrated in any site with minimal impact while providing visitors an effective means to express themselves in rich text.
Download - http://www.yiiframework.com/extension/niceditor
Demo - http://nicedit.com/demos.php - CLEditor
CLEditor is an open source jQuery plugin which provides a lightweight, full featured, cross browser, extensible, WYSIWYG HTML editor that can be easily added into any web site.
In addition to the standard text formatting features found in other WYSIWYG editors, CLEditor also contains rich drop downs for font name, size, style, text color and highlight color. CLEditor allows you to insert images, hyperlinks and horizontal rules.
Download - http://www.yiiframework.com/extension/cleditor
Demo - http://premiumsoftware.net/cleditor/ - WYMeditor
EWYMeditor is a wrapper for WYMeditor which is a web-based WYSIWYM (What You See Is What You Mean) XHTML editor (not WYSIWYG).
WYMeditor's main concept is to leave details of the document's visual layout, and to concentrate on its structure and meaning, while trying to give the user as much comfort as possible (at least as WYSIWYG editors).
WYMeditor has been created to generate perfectly structured XHTML strict code, to conform to the W3C XHTML specifications and to facilitate further processing by modern applications.
With WYMeditor, the code can't be contaminated by visual informations like font styles and weights, borders, colors, etc. The end-user defines content meaning, which will determine its aspect by the use of style sheets. The result is easy and quick maintenance of information.
As the code is compliant to W3C XHTML specifications, you can for example process it using a XSLT (at the client or the server side), giving you a wide range of applications.
Download - http://www.yiiframework.com/extension/ewymeditor
Demo - http://wymeditor.no.de/wymeditor/examples/ - JMarkItUp
JMarkItUp is a set of widgets (for Html, Textile, Wiki, Markdown, BBcode, Texy) that encapsulates the markItUp Content Editor (version 1.1.10).
markItUp! is a content editor plugin based on jQuery. It's not a WYSIWYG editor. Instead, it provides a lightweight, easy-to-use set of buttons, keyboard shortcuts, and other tools to add markup to your content.
markItUp! is a JavaScript plugin built on the jQuery library. It allows you to turn any textarea into a markup editor. Html, Textile, Wiki Syntax, Markdown, BBcode or even your own Markup system can be easily implemented.
markItUp! is not meant to be a “Full-Features-Out-of-the-Box”-editor. Instead it is a very lightweight, customizable and flexible engine made to meet the developer's needs in their CMSes, blogs, forums or websites. markItUp! is not a WYSIWYG editor, and it never will be.
Download - http://www.yiiframework.com/extension/jmarkitup
Demo - http://markitup.jaysalvat.com/examples/
Thursday, April 26, 2012
Best Rich Text Editors Yii Framework Extensions for Web Projects


Yii Framework Tutorials
Wednesday, March 21, 2012
Remove ?r= on Link URL Web Application Yii Framework
To get rid of ?r= the url link web pages on Yii Framework application then you need to do is remove the tag comment on the path-format URLs.
Example url before changed
http://localhost/webappname/index.php?r=site/index
Having changed
http://localhost/webappname/index.php/site/index
Example url before changed
http://localhost/webappname/index.php?r=site/index
Having changed
http://localhost/webappname/index.php/site/index
- Open the protected/main.config.php
- Find the following code
/*
  'urlManager'=>array(
   'urlFormat'=>'path',
   'rules'=>array(
    '/'=>'/view',
    '//'=>'/',
    '/'=>'/',
   ),
  ),
  */
In the code above we can see there is still a tag comment / * and * / - Remove the tag comment / * and * /
'urlManager'=>array( 'urlFormat'=>'path', 'rules'=>array( '/'=>'/view', '//'=>'/', '/'=>'/', ), ), - Completed, please reload the page and see your web application url link.
Monday, January 9, 2012
How to Use Crud Generator (Gii Tool - Yii Code Generator)
After I have discussed previously the Controller of making post "How to Use Controller Generator (Gii Tool - Yii Code Generator)" and also the model on the post "How to Use Model Generator (Gii Tool - Yii Code Generator)", I would go again in How to Use Crud Generator (Gii Tool - Yii Code Generator). CRUD (Create Read Update Delete) generator generates a controller and views that implement CRUD operations for the specified data model. Please follow these steps below to use this generator:
- Open yii code generator - http://localhost/webappname/index.php?r=gii/default/login
- Select Crud Generator and enter the name of your model you created in the Model Generator.
It should be noted that the use of uppercase and lowercase letters should be tailored to the name of the Model Class we have made to the Model Generator. In the previous example the discussion of Model Generator, Model name is its Class User (letter U in the word using the letters of the user). And select preview and cetang all existing Code File and click generate.
On Crud Generator you will see the results on protected\views\user\

generated controllers\UserController.php
generated views\user\_form.php
generated views\user\_search.php
generated views\user\_view.php
generated views\user\admin.php
generated views\user\create.php
generated views\user\index.php
generated views\user\update.php
generated views\user\view.php
- To view the results please click on try it now or go on http://localhost/webappname/index.php/user

- To operate the CRUD (Create-Read-Update-Delete), you must first login. Open http://localhost/webappname/index.php/site/login

- Then go again http://localhost/webappname/index.php/user/. You can see there is not a user.
- Have you gone to http://localhost/webappname/index.php/user/create. to create a new user - Create User
- If you have made, you can see it back in http://localhost/webappname/index.php/user/index - User List
- To Manage User (Create-Read-Update-Delete), you can open it in http://localhost/webappname/index.php/user/admin - Manage Users (View, Update, Delete)


Sunday, January 8, 2012
How to Use Controller Generator (Gii Tool - Yii Code Generator)
Once we have made previous models in the example application of Model Generator (Gii Tool - Yii Code Generator), we proceed again on making the controller. Controller Generator helps you to quickly generate a new controller class, one or several controller actions and their corresponding views. The following implementation steps Controller Generator (Gii Tool - Yii Code Generator)
- Login to Gii - http://localhost/webappname/index.php?r=gii/default/login
- Then click on the menu Controller Generator - http://localhost/webappanme/index.php/gii/controller
- Fill Controller ID with a user (in accordance with the table we have made)

- Click preview and then generate.

Generating code using template "D:\xampp\htdocs\yii\framework\gii\generators\controller\templates\default"... generated controllers\UserController.php generated views\user\index.php done!

- Click to try it now or go to this link http://localhost/webappname/index.php/user, and see the results


Wednesday, December 28, 2011
How to Use Model Generator (Gii Tool - Yii Code Generator)
Model Generator, generates a model class for the specified database table. In the application of Gii Tool - Model Generator you need a database to connect. Follow the steps below:
1. Create a simple MySQL database. For example I use yiicode as database name and user as table. See the attributes as follows:
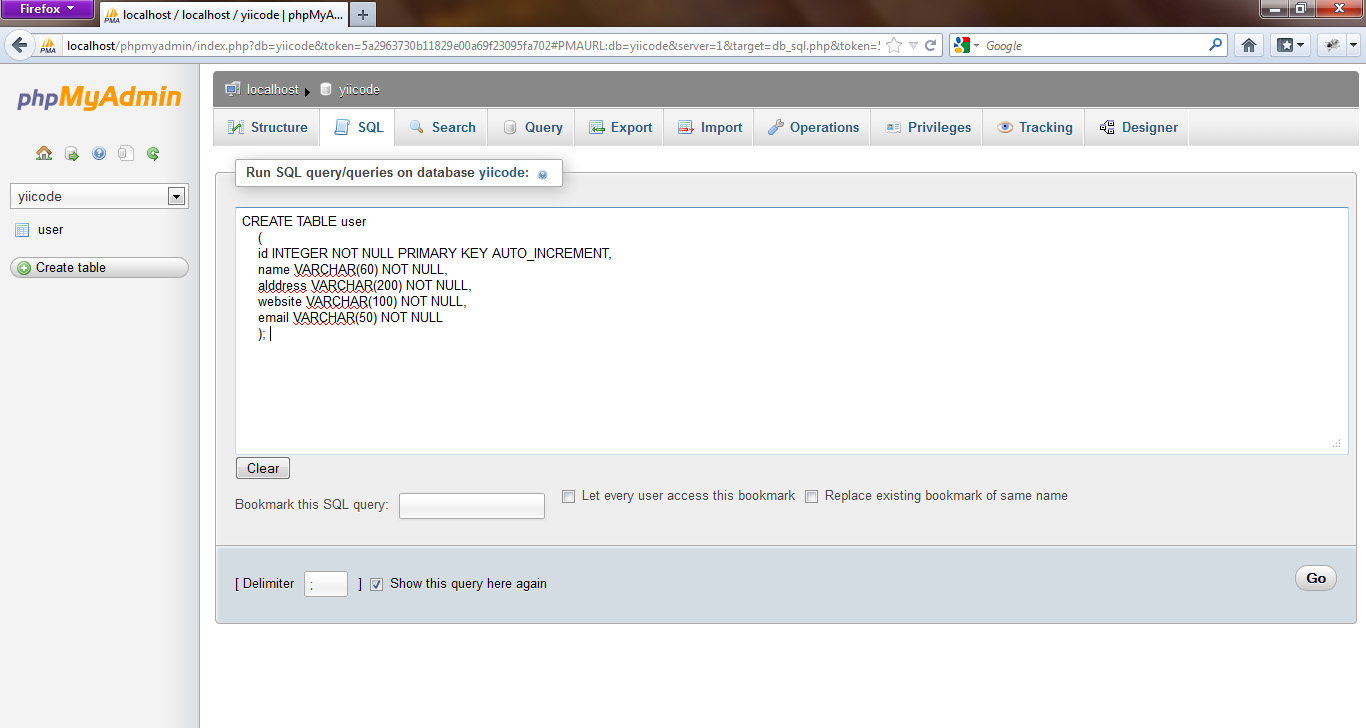
To make it, open http://localhost/xampp/, click on phpMyAdmin, click Databases, on the columns Create a new database typing demo, and click create. After that click on the SQL and create a user table by entering the following SQL command:
2. After that you please login to Gii - http://localhost/webappname/index.php?r=gii/default/login.
Typing in the Table Name * is tbl_user and in the Model Class * is User

You can see PHP code by click Preview button and the models\User.php. This code will be automatically stored in the xampp \ htdocs \ yourappname \ protected \ models \ User.php.
After it, click the Generate button
If successful will appear in the following:
1. Create a simple MySQL database. For example I use yiicode as database name and user as table. See the attributes as follows:
| Field | Type | Lenght/Values | Exrta | Primary |
| id | int | - | auto_increment | Yes |
| name | varchar | 60 | - | - |
| address | varchar | 200 | - | - |
| website | varchar | 100 | - | - |
| varchar | 50 | - | - |
To make it, open http://localhost/xampp/, click on phpMyAdmin, click Databases, on the columns Create a new database typing demo, and click create. After that click on the SQL and create a user table by entering the following SQL command:
CREATE TABLE user
(
id INTEGER NOT NULL PRIMARY KEY AUTO_INCREMENT,
name VARCHAR(60) NOT NULL,
address VARCHAR(200) NOT NULL,
website VARCHAR(100) NOT NULL,
email VARCHAR(50) NOT NULL
);
Typing in the Table Name * is tbl_user and in the Model Class * is User

You can see PHP code by click Preview button and the models\User.php. This code will be automatically stored in the xampp \ htdocs \ yourappname \ protected \ models \ User.php.
After it, click the Generate button
If successful will appear in the following:
The code has been generated successfully.That means you have successfully created a model to perform CRUD operations.
Generating code using template “xampp\htdocs\yii\framework\gii\generators\model\templates\default”…
generated models\User.php
done!
Saturday, December 10, 2011
Configuration Gii Tool (Yii Code Generator)
Gii (automatic code generation) is a Web-based code generator tool of Yii to develop a web application development productivity. Gii is implemented as a module and should be used in the Yii application. To use Gii, you have to do some Gii configuration first. The following configuration steps Gii (producer of automatic code - Code Generator):
- Have you open the protected / main.config.php
- Find the following code
// uncomment the following to enable the Gii tool /* 'gii'=>array( 'class'=>'system.gii.GiiModule', 'password'=>'admin', // If removed, Gii defaults to localhost only. Edit carefully to taste. 'ipFilters'=>array('127.0.0.1','::1'), ), */ ), - Remove the tag comment / * and * /, so like this
// enable Gii tool 'gii'=>array( 'class'=>'system.gii.GiiModule', 'password'=>'Enter Your Password Here', // If removed, Gii defaults to localhost only. Edit carefully to taste. 'ipFilters'=>array('127.0.0.1','::1'), ), ), - Change Your password in Enter Your Password Here, for example 123456
// enable Gii tool
 'gii'=>array(
  'class'=>'system.gii.GiiModule',
  'password'=>'123456',
   // If removed, Gii defaults to localhost only. Edit carefully to taste.
  'ipFilters'=>array('127.0.0.1','::1'),
 ),
),
Now you have to login to Gii tool by open a web browser and type the http://localhost/yiicode/index.php?r=gii/default/login
Changes yiicode with your application name.
 |
| Before login Gii (Yii Code Generator) |
 |
| After login Gii (Yii Code Generator) |
Tuesday, November 8, 2011
Configuration Yii Framework to MySQL Database
By default Yii Framework to connect to SQLite database. It can take a look at webappname \ protected \ config \ main.php. Consider the following code:
In the code above shows the application to connect to SQLite database where there are no tag "comment" while in MySQL there is a tag "comment" which means the code will not be processed. We need to do is
*/
'db'=>array(
 'connectionString' => 'sqlite:'.dirname(__FILE__).'/../data/testdrive.db',
),
// uncomment the following to use a MySQL database
/*
'db'=>array(
 'connectionString' => 'mysql:host=localhost;dbname=testdrive',
 'emulatePrepare' => true,
 'username' => 'root',
 'password' => '',
 'charset' => 'utf8',
),
*/
In the code above shows the application to connect to SQLite database where there are no tag "comment" while in MySQL there is a tag "comment" which means the code will not be processed. We need to do is
- Adding a tag comment / * and * / on SQLite SQLite database that is not executed. Consider the following code:
/*
'db'=>array(
 'connectionString' => 'sqlite:'.dirname(__FILE__).'/../data/testdrive.db',
),
*/
- Remove the tag comment / * and * / to MySQL database and rename testdrive.db (default) with the name of your database. example yiicode_db
// Using MySQL database
'db'=>array(
 'connectionString' => 'mysql:host=localhost;dbname=yiicode_db',
 'emulatePrepare' => true,
 'username' => 'root',
 'password' => '',
 'charset' => 'utf8',
),
/*
'db'=>array(
 'connectionString' => 'sqlite:'.dirname(__FILE__).'/../data/testdrive.db',
),
*/
// Using MySQL database
'db'=>array(
 'connectionString' => 'mysql:host=localhost;dbname=yiicode_db',
 'emulatePrepare' => true,
 'username' => 'root',
 'password' => '',
 'charset' => 'utf8',
),
Subscribe to:
Posts (Atom)